Diagnosis and Maintenance
One of the most important steps in a high pressure system is to establish a regular maintenance program. This will vary slightly with each system and is determined by various elements such as the duty cycle, the liquid being pumped, the actual specifications vs rated specifications of the pump, the ambient conditions, the inlet conditions and the accessories in the system. A careful review of the necessary inlet conditions and protection devices required before the system is installed will eliminate many potential problems.
CAT PUMPS are very easy pumps to service and require far less frequent service than most pumps. Typically, only common tools are required, making in-field service convenient, however, there are a few custom tools, special to certain models, that do simplify the process. This service manual is designed to assist you with the disassembly of your pump. The following guide will assist in determining the cause and remedy to various operating conditions. You can also review our FAQ or SERVICE sections on our WEB SITE for more facts or contact CAT PUMPS directly.
Maintenance, problems and causes
| Control | daily | 50 Std. | 3000 hrs. or 1x a year | As needed |
|---|---|---|---|---|
| Oil level/quality | X | |||
| Öl Leckagen | X | |||
| Leakage at the pump head | X | |||
| First oil change after commissioning | X | |||
| Oil change | X | |||
| Changing the seals | X | |||
| Changing the valves | X | |||
| Overheating | X | |||
| Unusual running noises | X |
Caution! Make sure the pump cannot be started during oil change. (Turn power supply off)
Before start up of the pump make sure lubrication oil is filled into the crankcase. If not filled, fill crankcase with CAT PUMPS special Crankcase Oil ISO 68.
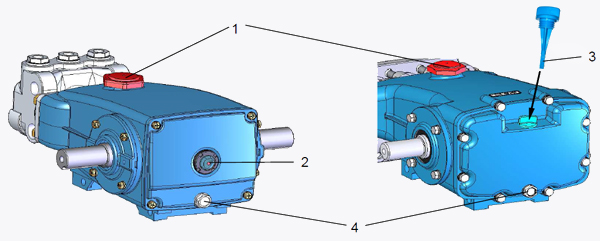
To fill crankcase with oil remove red oil filler cap (1) and fill crankcase with oil up to the middle of the red dot on the bubble gauge (2) or up to the marked area on the dip stick (3).
The quantity of oil required is extract in pumps data sheet. On pump running below 500 rpm, the oil level should be increased above the middle of the oil bubble gauge. The level should cover the plunger rod slightly. (Please check visually by looking into the oil filler bore).
For oil exchange remove the oil drain plug (4) and drain the oil . After the oil is changed completely, fill in new oil as described before.
Take care that waste oil desposed according to actual local reglations!
Probable cause:
- Worn nozzle
- Belt slippage
- Air leak in inlet plumbing
- Pressure gauge inoperative or not registering accurately
- Relief valve stuck, partially plugged or improperly adjusted
- Inlet suction strainer (filter) clogged or improperly sized
- Abrasives in pumped liquid
- Leaky discharge hose
- Inadequate liquid supply
- Severe cavitation
- Worn Seals
- Worn or dirty inlet/discharge valves
Probable cause:
- Faulty Pulsation Dampener
- Foreign material trapped in inlet / discharge valves
Under the manifold:
- Worn V-Packings or Low-Pressure Seals
- Worn adapter o-rings
Into the crankcase:
- Humid air condensing into water inside the crankcase
- Excessive wear to seals and V-Packings
Inlet supply:
- Inadequate inlet liquid supply
Bearing:
- Broken or worn bearing
Pulley:
- Loose pulley on crankshaft
Crankcase oil seals:
- Worn crankcase oil seals
Crankshaft oil seals and o-rings:
- Worn crankshaft oil seals or o-rings on bearing cover
Drain plug:
- Loose drain plug or worn drain plug o-ring
Bubble gauge:
- Loose bubble gauge or worn bubble gauge gasket
Rear cover:
- Loose rear cover or worn rear cover o-ring
Filler cap:
- Loose filler cap or excessive oil in crankcase
Inlet conditions:
- Restricted inlet or air entering the inlet plumbing
Pump valves:
- Stuck inlet / discharge valves
Pump seals
- Leaking V-Packings or Lo-Pressure seals
- Scored plungers
- Over pressure to inlet manifold
- Abrasive material in the liquid being pumped
- Excessive pressure and/or temperature of pumped liquid
- Running pump dry
- Starving pump of adequate liquid
- Eroded manifold
